Kids always want a drawing of a car or get homework to draw a car. Parents get hung up for a few minutes because they don’t know how to draw a car for their kids.
Now you can calm down. After going through this blog post, you will be a pro at drawing a car. You can say yes if your kid tells you to draw a car.
Now I will discuss several steps and strategies you must go through while drawing a car.
Follow the below steps;
- Gather the necessary materials
- Draw the basic outlines of the car
- Add details to the car
- Add windows and doors
- Draw the wheels of the car
- Create the hood and headlights
- Add the grills, bumpers, and other details
- Color the car
- Finish touches and display the finished car
How to Draw a Car for Kids
STEP 1: Gather the necessary materials

If you are going to draw something, you only have to grab your sketchbook and material.
Your sketch tool and material should be perfect. Thus, by using them, you can make a drawing perfectly.
I will provide you with a list of which must be present in your sketch tools and materials.
- Pencil.
- Pastel pencils.
- Colored pencil.
- Crayons.
- Conte sticks.
- Charcoal sticks and pencils.
- Graphite sticks.
- Pens.
- Brushes.
- Ink.
- Sharpeners.
- Erasers.
- Paper.
- Sketch board.
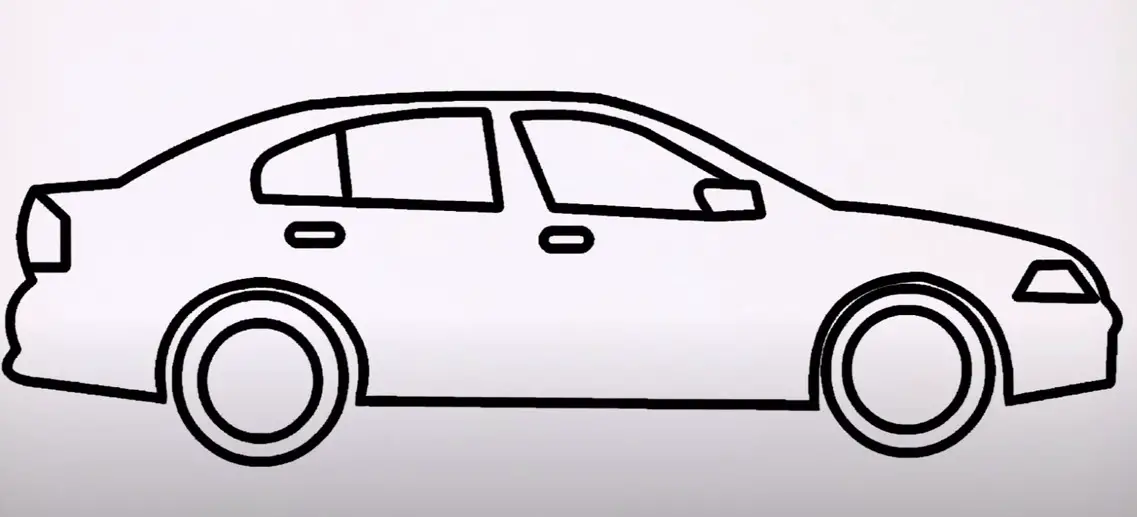
STEP 2: Draw the basic outlines of the car

Now grab your pencil. Outline a car as shown in the above picture.
Your skeleton, or outline, is based on the outline and must be understood fully.
If you outline incorrectly, then your full drawing will have vanished. Drawing depends on an outline.
Learn More: How to Draw Car Logos
STEP 3: Create the hood and headlights

Drawing a hood and headlights is part of an outline. It would help if you kept the above pictures open in front of you. Trace your pencil according to it.
- You have to draw a circle-type shape for a hood, as shown in picture 1.
- But the circle should be partially round.
- You have to draw a mini circle inside a hood. Looking for the headlight.
- After making a headlight, you have to go vertically straight.
- Then, move horizontally downward. As shown in picture 2.
STEP 4: Draw the wheels of the car

Now we will discuss the following steps to draw a wheel of a car:
- Draw a circle in a wheel part of an outline. As shown in picture 1.
- Then again, draw a circle inside the first circle. As shown in picture 2.
- Now apply the same procedure on the back wheels.
- Draw a circle as a back wheel. As shown in picture 3.
- Again, draw a circle inside the first circle. As shown in picture 4.
Now both wheels are drawn.
STEP 5: Add windows

After drawing the wheels of a car, the next part you have to draw is the car windows.
To draw the window of the car, you have to follow the following steps:
- Draw half of a semi-circle as a window in a car, as shown in picture 1.
- Apply the same procedure for drawing a back window of your sketch car.
- Draw half of a semi-circle again to look at the back window. As shown in picture 2.
- Here is your windows drawer.
STEP 6: Add details to the car

Giving detail to your sketch after drawing parts of the car is important.
Like, add a detail in your sketch car window.
1.Draw a straight vertical line on the back window of your sketch car., as shown in the above picture.

- Draw a semi-pentagon looking for a backlight. As shown in picture
- Draw circles down to windows looking for the door handle.
This detail will enhance the look of your sketch car window. You can do it with every part of your sketch car to give it a realistic look.
STEP 7: Finish touches and display the finished car

The last step in sketching is always giving a final touch. Thus, look deeply at your sketched car and examine every part to make sure all are perfectly drawn.
STEP 8: Color the car

The drawing is complete with colors. So now it’s time to color your sketch car.
You can add any of your choice colors. It can be red, blue, black, etc. I will go with a blue color.
Here is how my car looks after a color.
Just have a look at the above picture of my drawn car. Then have the same look on your sketch car and ensure my and your car match.
Frequently Asked Questions
What materials do I need to draw a car for kids?
To draw a car for kids, you will need paper, a pencil or pen, an eraser, and colored pencils or markers (optional).
Can I use a reference image to draw a car for kids?
Yes, using a reference image can be helpful when learning how to draw a car. Look for simple car designs with basic shapes and lines that can be easily replicated.
What are some tips for drawing a car for kids?
Some tips for drawing a car for kids include starting with basic shapes, such as rectangles, circles, and triangles, and building on them to create the car’s body. Use light pencil strokes to create a rough sketch before adding details and coloring. Finally, feel free to make mistakes and experiment with different designs and colors.
Expert Opinion
Parents want to be an artist. When their kid is forced to have a drawing of a car, if they are not well at drawing a car, then they can be after going through the above steps.
Drawing a car is easy with the correct steps.
You have to get up, grab your sketch tool, then follow my steps, and it’s done.
Once your sketch car gets completed, you can show and surprise your kid. Trust me. They will love it.

James Carter is an automotive blogger, reviewer, and technology enthusiast based in the USA. With a deep passion for cars and years of experience following the automotive industry, James focuses on delivering honest, well-researched content that helps readers make smarter decisions.