How to Remove Rust Stains from White Car Paint | Step by Step Guide

0

Your car’s paint itself is not a problem. However, clear urethane gives protection to the color coating. To remove these metal stains and associated rust from your vehicle, you can use rust removal chemicals such as whitewash white car cleaner. Let’s learn how to remove rust stains from white car paint.

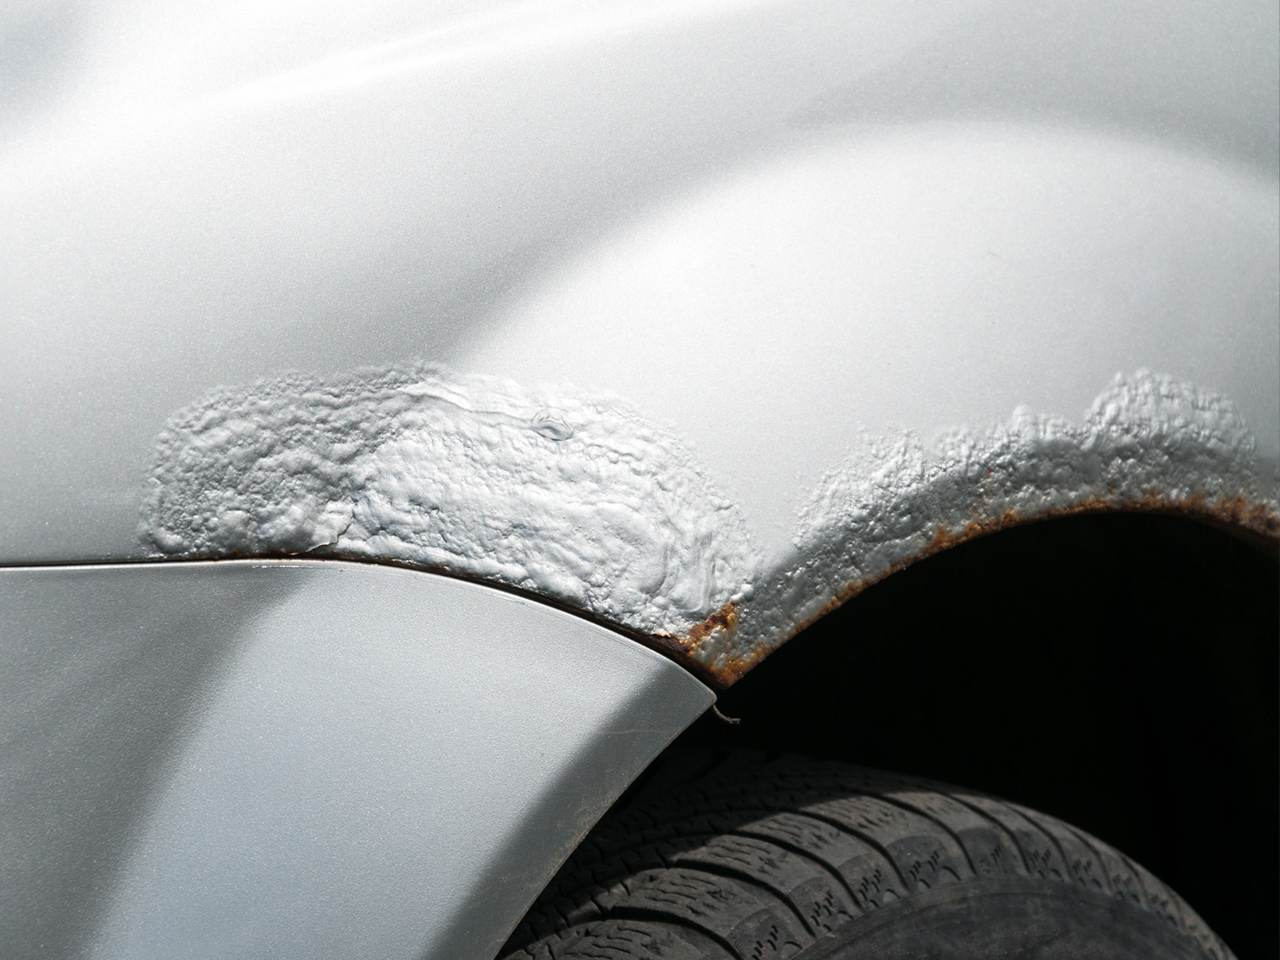
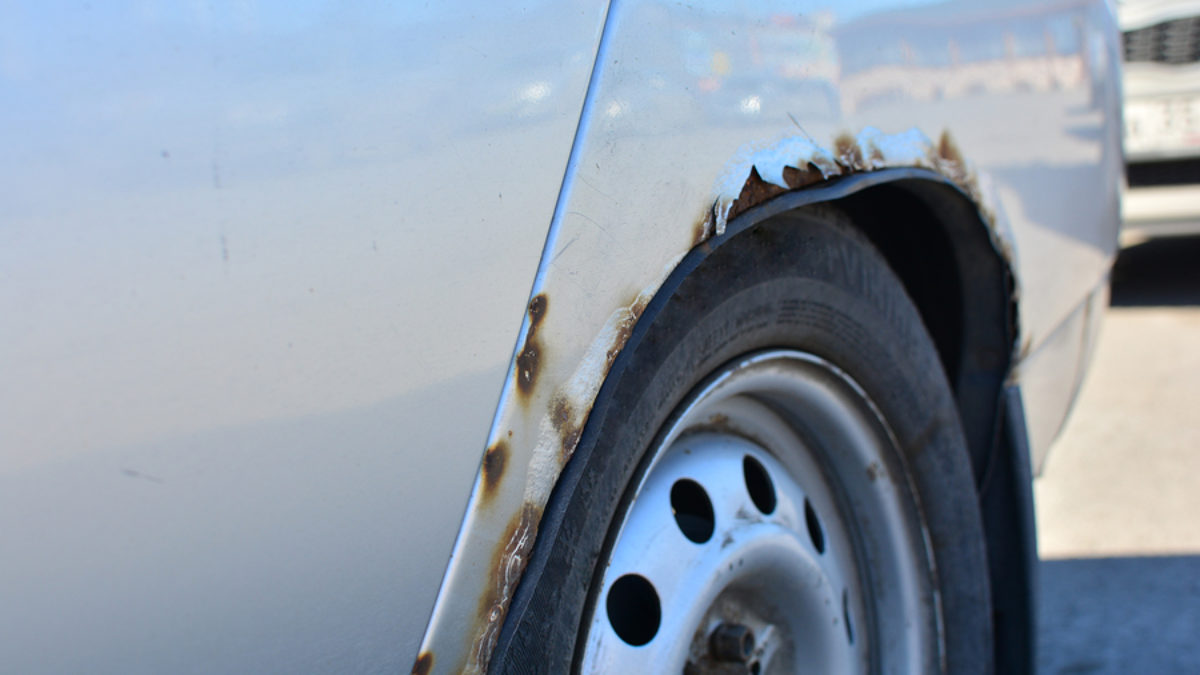
Rust stains are unattractive. When they appear on your vehicle’s paint, they look considerably worse. They give the car an aged and neglected appearance. Although this is not always the case, Rust spots are caused by the presence of rusty metal particles on the surface of your car.

Rust stains are left on the surface after the water runs off the paint. Because of the many options available, it’s easy to get rid of these ugly stains.

To your relief, the bodywork on your vehicle doesn’t look rusty. Even if you have rust holes in the sheet metal, that’s not the cause of the orange spots on your white paint. To make matters worse, there are metal particles embedded in the clear coat of your white car, and they are rusting. 

If you use a clay bar or other physical procedure to remove these metal bits, you risk dragging them over the clear coat and ruining your beautiful white surface. 

How to Remove Rust Stains from White Car Paint

How to Remove Rust Stains from White Car Paint

The first step is to do as much work as indoors, such as in your garage, to save on energy costs. To complete the second step, choose a day with little wind and pleasant temperatures to take advantage of it.

  • Use the right tape to cover the rusted part of the car. Tape should be spread around the room.
  • Remember to follow the instructions on the rust remover, so please do so. After that, wipe it down with a clean cloth to finish it.
  • You can remove any remaining rust by sanding it with sandpaper.
  • To remove both oil and wax from a surface, use a soap designed to do so.
  • First, find out the stained area, and apply a primer layer.
  • Be sure to apply three coats of light to medium-colored skin.
  • Allow it to dry for one hour.

What to do if the rust doesn’t come out?

Following this procedure:

  • Cover the damaged section of the vehicle with masking tape or masking tape. If you intend to sand through the paint and primer, protect the rest of the car. This way, you will be protected from finer particles.
  • Be sure to wear a mask.
  • Remove surface rust with a grinder.
  • It’s important not to press too hard when you use the grinder!
  • A degreaser can be used to clean up the work area, making it look better. Fiberglass body parts filler can be used to fill dents and dings.
  • Use increasingly fine sandpaper to sand the filler.
  • Tape the area you are going to paint before starting.
  • Put on a self-etching primer before you start painting When you dry something, you must pay attention to how long it takes.
  • Spray the area with paint and let it dry between coats.
  • We recommend finishing with a clear coat (or two).

How Do I Get Rust Spots Off My Car?

How to Remove Rust Stains from White Car Paint

You can’t just sit around and wait for something to happen if you want to waste your time. Things will become even more difficult in the future due to this. Before anything else, clean and prepare the area.

Use sandpaper or an abrasive disc for sanding the metal surface clean. When removing the surface rust, you must preserve it from future corrosion. Seal the corroded area with paint products to protect it from oxygen and rust for a long time. As a result, it will serve as a solid base for the final coat of paint. Apply the vehicle paint as soon as it is dry.

What Causes Tiny Rust Spots On Cars?

What Causes Tiny Rust Spots On Cars

Small rust spots on your car’s paint may have piqued your curiosity. Some people may think that their vehicle has a problem with simply rust. Rust appears by small metal shavings embedded in your vehicle’s paint.

The “railhead dust” that results from the train wheels rubbing against the rails is called “railhead dust.” When the shavings come into contact with the air, they float to the surface of your car, where they scratch the paint. The rust spots on your car’s paint result from the chips oxidizing over time.

What do I do when my white car gets dirty between White+Wash treatments?

What do I do when my white car gets dirty between White+Wash treatments

Remember to apply whitewash white car cleaner once every six months. However, one wash of your car is probably more than once a year! In between treatments, use high-quality car wash soap. With polymeric spray wax, you can get rid of the dirt and detritus you love.

  • Washing the car in direct sunlight will generate water spots on the paint because the soap and water will dry on the surface too soon.
  • A wash mitt is a tool that helps you clean your white car. Before using it, rinse your car to get rid of any dirt.
  • Use a mitten or soft cloth and a bucket of fresh water.
  • Proceed from top to bottom for the pre-wash, wash, and final rinse.
  • Use a new terrycloth towel to dry the vehicle completely.

Bottom line

This causes the exterior of your vehicle to show signs of corrosion caused by the presence of rusty metal particles. Before you start painting, put down an adhesive curtain in the area you want to paint. Grinder: You can use one to get rid of surface rust. It is also possible to use putty to fill in scratches and dings on a surface with a smooth finish.

Apply the paint to the vehicle as soon as it is dry. Noxious metal fragments are embedded in your car’s paint because of toxic fumes. You can remove the remains with a plasticized glass spray.

How to Get Rust Stain off Car Paint | Step by Step Guide

0

You ought to avoid rust spots. And if they are on your car’s paint, they look even worse. They make the car look shabby and neglected. However, this is not always the case. Instead, the surface water of your vehicle is contaminated with rusty metal particles from rusty spots, which is what causes these problems. So, use chemicals to remove rust at home or hire a professional to remove rust stains from painted surfaces inside and outside your home. Let’s learn how to get rust stain off car paint.

Rust is a problem that many car owners have to deal with regularly. Even a new car can develop rust if it is often driven in wet conditions. Car rust can be caused by a wide range of things, from precipitation to snow and even rock chips and stains. They can be seen on the paint once the water evaporates.

Rot is another name for rust, which helps explain how quickly rust can corrode metal car parts right before your eyes. Fortunately, you can repair mild to moderate car rust damage.

How to Get Rust Stain off Car Paint

How to Get Rust Stain off Car Paint

Steps to Remove Rust Stains from Car Paint

Do this indoors, such as in your garage. The second option is to choose a day when the weather is calm and the wind is not too strong.

For small rust spots, use an aerosol or liquid rust remover. 

It would be best to cover the rusted area with the appropriate tape. 

Read the rust remover instructions and follow them. Wipe it off with a clean cloth after letting it sit for a few minutes.

  • Use a soap that removes oil and wax to clean. Dry after a bath or shower.
  • Spray some primer on the area to begin the protection. A light to medium coat may suffice, but be careful to spray three applications.
  • Allow drying for one hour.

Now use a towel to Remove Rust Stains from Car Paint.

  • Using a microfiber towel, a hose, and two buckets of water, wash your car. Drying is the primary purpose of this microfiber towel.
  • Once the car is dry to the touch, use a clean microfiber cloth to apply the all-in-one polish to the desired area. Use circular, side-to-side motions to remove rust from the product.
  • Repeat steps 1 and 2 if necessary to remove any discoloration.
  • If the rust stain is old and difficult to remove, use a highly abrasive polish.
  • Once you remove the stain, use a clean microfiber cloth to give the surface a brilliant shine.
  • Apply wax or sealer as a precautionary measure.

Frequently Asked Questions

Does WD 40 Remove rust?

WD-49 is a chemical you can use to remove rust. It dissolves the connections between the corrosion and the metal. There is no need to scrape with this product, as it lubricates the already loosened rust and makes it easy to remove. You need to apply WD-40, wait a few hours, and then wipe off the chemical with a damp cloth.

Do rust converters work?

One of the cutting-edge ways of dealing with considerable rust on a car is to use a rust converter. The corrosion layer changes into a polymeric coating on the outside of the vehicle. Before applying rust converters, it is necessary to thoroughly prepare the vehicle’s surface according to the manufacturer’s instructions. You can remove both heavy and medium rust with rust converters.

How do you neutralize rust on a car?

Before painting or waxing a car, auto detailers and do-it-yourself repair specialists use rust neutralization to remove rust from the surface. Removing rust from your vehicle is the most direct way to neutralize rust on your car.

As the corroded area and metal of the car are pitted, an abrasive agent, such as variable grit sandpaper or disc, is used to expose a clean metal surface. Once the car’s metal surface has been primed, it will be painted with automotive paint, finished with a clear coat, waxed, and polished to remove any flaws.

What is the best automotive rust remover?

A wide variety of rust removal products are available on the market. There are numerous methods to remove rust from an automobile, from lubricants, sprays, and high-end chemicals to home cures. Automotive rust removers that is effective on the types of these products:

  • WD-40
  • Lubricants
  • Sprays
  • Distilled White Vinegar
  • Baking Soda and Potato

Does vinegar kill rust on cars?

Indeed, you can use vinegar to get rid of rust on metal surfaces. Vinegar can dissolve the bonds between the metal surface and the rust molecules if sandpaper removes the rust from the affected region before soaking it in vinegar.

Everything will take some time to fix. After 4 to 5 hours, you can use a microfiber cloth to clean the rust-damaged area.

Is fixing the rust on a car worth it?

It depends on a variety of factors, including the age of the vehicle, mileage, value of the vehicle when it is sold. Taking into account the amount and type of surface rust and its location is essential. Removing surface rust is inexpensive and straightforward. You can repair flaking, but it requires a new paint job. However, the metal has been damaged because of the deep rust. So, it may need considerable restoration work. It is expensive and not advised for older cars with a lot of penetrating rust.

Bottom line

Rust is one of the standard car repair and maintenance problems car owners often face. It occurs when the water on the surface of your vehicle becomes contaminated with rusty metal particles. Fortunately, you can remove minor and medium-grade rust from the car. So, it is possible to remove rust from car paint. You need to spray WD-40 on the affected area, wait a few hours, and then wipe the chemical off easily.

Rust converters are one of the most advanced solutions to treat extensive rust on vehicles. Use sandpaper to loosen the rust before soaking it in the vinegar. You can remove the surface quickly, and it is affordable.

How to Join Two Battery Cables Together | Step by Step Guide

0

All the small wires connecting the batteries are similar in size, while all the long cables are similar. Disconnect the broken terminal, remove the insulation from the cable, place the repair splice on the line, and reconnect the splice to the battery. Battery cable repair splices are convenient and convenient because they allow you to replace only the terminal end while maintaining an OEM style fit. Let’s learn how to join two battery cables together.

How to Join Two Battery Cables Together

How to Join Two Battery Cables Together

Installing a battery cable on a starter motor

The red cable connector connects to the positive terminal, while the black cable connector connects to the negative terminal. This is true regardless of whether you replace the battery or the starter motor. 

Does the positive battery cable connect to the starter?

Disconnect the two battery cables (positive and negative) and reconnect them. You can use insulating tape, cable ties, or clamps. Allow the wires to remain connected for at least 30 minutes without touching the battery terminals (you can use a bungee to “hang” them from the open hood if necessary).

Battery Cable Connections

Through the negative (ground) cable, the battery’s negative “-” connector is connected to an engine cylinder block or transmission near the starter motor. The starter solenoid connects the battery’s positive “+” terminal to the positive cable.

Battery cable connections

Selecting the optimal cable size (diameter) and length for overall efficiency is critical. Power is lost when cable lengths are excessively short or excessively long, and resistance increases.

Parallel, series, and series/parallel battery connections should be made with identical cable lengths. Common cable resistance is used for all battery connections to ensure synchronized system performance.

How to Connect Batteries

How to Connect Batteries

There are numerous methods for connecting multiple batteries to acquire the appropriate voltage or capacity for a DC installation. Connecting various batteries in a single large bank, rather than as individual banks, increases their efficiency and ensures their longevity.

Series Connection

By increasing voltage while preserving the same ampere-hour capacity is possible when batteries are connected in series. For example, combining two 6V 150Ah batteries in a series will provide 12V but only 150Ah capacity. Two 12V 150Ah batteries connected in series will provide 24V. 

Parallel Connection

Connecting batteries in parallel double their capacity while maintaining the same voltage. For example, connecting two 12V 150Ah batteries in parallel gives a voltage of 12V but a capacity of 300Ah.

Series/Parallel Connection

You can use this combination of approaches with 2V, 6V, or 12V batteries to increase the system voltage while increasing the capacity. For example, four 6V 150Ah batteries connected in series or parallel provide 12V at 300Ah. Also, you can connect four 12V 150Ah batteries in series or parallel to create a 24V 300Ah system.

In addition, the location of the main system wires that connect to the battery bank is important to consider. Too often, the system connections feeding the loads must connect to the first or “easiest” battery in the bank, resulting in sub-optimal performance and life. You should secure these primary system cables, which relate to your DC distribution (loads), throughout the bank.

This ensures that the entire battery bank charges and drains consistently, resulting in optimal performance.

The cables connecting the batteries to the main system should be sufficiently large (in diameter) to carry the system’s total current. If you have a large battery charger or inverter, you must ensure that the cables can handle the potentially huge currents generated or used by this equipment and the rest of your loads.

Series connection

Connect the batteries to get a higher voltage, 24 or 48 volts. When two batteries are connected in series, the positive terminal is connected to the negative terminal of the other. The first battery’s negative pole and the last’s positive pole make up the system. This is a 24V, 120Ah bank.

Parallel connections

A parallel coupling connects the positive poles of many batteries and the opposing poles in the opposite direction. The first battery has a positive charge, and the last battery has a negative charge. Utilizing this arrangement allows for increased capacity (in this case, 12V 240Ah).

Series/Parallel Connection

For example, combining series and parallel connections are necessary if you want a higher capacity 24-volt battery set. You must connect the battery to the system parallel using the first battery’s positive pole and the last’s negative pole, other essential points to bear in mind when wiring.

With no connections near bilge water or other wet areas, all circuits should be elevated to the greatest extent possible.

All wire terminal connections should be crimped rather than soldered for security.

Bottom line

In the vicinity of one meter of the compass, it is recommended that you use a two-wire cable.

Never connect new equipment to existing circuits; instead, run a new duplex cable of the correct size (positive and negative wires in a single sheath) from the distribution panel (or other power sources) to the apparatus.

It is advisable to name all wires at both ends and have an up-to-date wiring plan to help troubleshoot future problems.

Each circuit should have its ground connection, which should ultimately be connected to a single ground point/bus bar attached to the battery negative. This is the only place where the grounds should be connected to avoid the catastrophic stray current.

You should support the cables every 450 mm unless they are in conduit.

In the United States, black is used for both the DC negative and the live wire in AC circuits. It’s best to keep the two types of cables separate. To ensure their safety, one or the other must be sheathed even if they must run together.

While working with the DC system, ensure your safety, be sure to turn off any available AC power sources (the earth ground, the onboard AC generator, or an inverter).

How to Get Seafood Smell Out of Car | Pro Tips You Must Apply

0

Combine two quarts of water and one cup of vinegar and rub it on the area where the fishy smell is coming from with an old rag. Vinegar works as an odor absorber. It also performs as a natural cleaner. It penetrates the car’s upholstery fibers. We will break down some tips on how to get seafood smell out of car.

Generally, anglers or seafood enthusiasts are the most likely to encounter this problem, but it can affect anyone. At times, this odor can even make you hesitate to drive. Seafood odors are often highly overwhelming. They may feel nauseous. In that case, treat them as soon as possible.

Take action immediately to remove the odor from your car. Use a vinegar and water solution (one cup of vinegar for every two liters). Rub the answer into the carpet fibers and allow the area to dry. If you still smell it, sprinkle baking soda over the affected area.

How to Get Seafood Smell Out of Car

How to Get Seafood Smell Out of Car

Air Your Car Out

The first thing you can do is ventilate your car. Open all the windows and let the odor dissipate with the air. For the most significant effects, do this on a windy day.

This speeds up the flow of air through your vehicle. This may be enough if you hurry to get rid of the odor.

It goes without saying that if the fishy odor is already present in your carpet, this will not be effective. You must eliminate the source of the odor to receive long-term treatment.

Scrub with Soapy Water

Soapy water can remove certain odors. Once the source of the odor has been identified, you can begin eliminating it. You’ll want to clean everything up as soon as possible, so don’t put it off.

Next, Dish soap and warm water should be combined until the soap begins to lather. Soak an old rag or a soft brush in the soap and water mixture for a few minutes before using it. Firmly but gently, scrub the stain into your carpet.

You should not use a bristle brush or scrub too hard. This could damage your carpet and clarify that a stain has occurred. Instead, use slower strokes and softer bristles to allow the soap to penetrate the carpet.

When you’re done scrubbing, use a towel to absorb as much water as possible from the area. If you have access to a waterproof vacuum, you can use it here. Repeat as needed to remove the odor.

Vinegar and Baking Soda Method

The vinegar and baking soda approach are inexpensive and effective methods to remove fishy smells. 

  • A filthy rag
  • Sodium bicarbonate
  • A brush with soft bristles
  • A soiled towel

More Tips to Remove Fish Smell

More Tips to Remove Fish Smell

To remove fish odors using these tools, follow these steps:

Mix Water and Vinegar

To start:

  • Combine the water and vinegar.
  • Ventilate the whole area, and add one cup of vinegar.
  • Remember to prepare the vinegar by adding 1 cup every two quarts of water.
  • Make sure the area is well ventilated.

Vinegar can have a strong odor, so it is essential to breathe it in well.

It is worth putting up with the pungent odor. Vinegar is an excellent absorbent and odor eliminator. Vinegar is effective against various scents and can neutralize even the most potent fish odors.

Apply with a Rag

Make an application of a vinegar and water solution to the affected area. With an old rag, gently rub the mixture into the carpet. Make certain to thoroughly wet the area.

It is essential to soak the area well. Once the stain is sufficiently wet, use the rag to wipe the surface. However, you may have to brush it off. After letting the vinegar soak in, you can scrub with the brush.

Scrub the Spot

Scrub the stain with a soft bristle brush to remove any remaining residue. First, you may need to wet the bristles with vinegar and water solution. After that, gently clean the affected area. Circular motions and multiple fiber angles are examples of this.

You refrain from scrubbing too vigorously if you’re concerned about damaging your carpet or upholstery. Excessive pressure can cause irreversible damage to the fibers in the carpet. Instead, gently massage the vinegar into the fibers with your fingertips.

Remove the Excess Water

Once you are satisfied with the cleaning, wring out the excess water. You can blot the area with an old towel. This removes the extra moisture and allows it to dry quickly. If you leave the room wet for an extended time, it increases the chance of bacteria growth.

Allow to Dry

A small fan or an open window may help speed up the process. Several scrubbing sessions may be necessary to remove the odor altogether. Once the area has dried, you will be able to judge if the smell has been completely removed.

Vinegar Alternatives

As an example, suppose you want to eliminate fish odor but don’t like the smell of vinegar. Unfortunately, many remedies include vinegar as an odor neutralizer. However, there are alternative possibilities.

In the cleaning area of your local supermarket, there should be a variety of odor-eliminating cleaners, carpet cleaners, and sprays. 

You may apply these cleaners many times to remove fishy odors altogether. Intense aromas may not dissipate the first time completely. Reusing them until the smell goes may be the best option.

Bottom line

It can be highly infuriating to be forced to drive a car that smells fishy. This can happen for various reasons, and regardless of the cause, it will be infuriating.

Perhaps you’ve caught fish and transported it in your car, or maybe you’ve bought seafood and had a spill in your vehicle.

However, solving this problem is not impossible; you have to learn what to do. With the help of this material, you should now be able to drive your car without fear of smelling fishy.

In the future, you will almost certainly have to be more careful when transporting fish or any food containing fish. You don’t want to spill any of it in your car, but at least you’ll be ready if the worst-case scenario happens.

Coping with a fishy smell in your car doesn’t have to be time-consuming if you follow the tips above.

How to Put a Car Engine in a Boat | An Expert Guide

0

Car and boat engines are very similar. You must equip the boat’s engine with a cooling system. One cooling method uses seawater or freshwater to keep the engine cool and running smoothly (instead of a radiator). Another technique uses a keel cooler. Aligning the shaft, gearbox, and motor to avoid vibration and wear is not impossible, but many people get it wrong, resulting in sinking, expense, and old death. Let’s learn how to put a car engine in a boat.

The general public shouldn’t be a big concern since many gasoline marine engines are performed for automobiles. For example, the 5.7-liter engine in a Merc is a marine version of the 350-cubic-inch Chevy engine, and so on. For the most part, the term “marinizing” refers to modifying a vehicle’s electrical systems to make them more waterproof and reversing engine rotation.

Boats with inboard engines are the most likely to succeed in this circumstance (the propeller shaft exits the hull near the stern). This is the second-best option for a boat with an inboard or outboard engine or stern drive.

As a general rule, Mercury Marine and Volvo have historical relations. All this was because their beginnings were with automotive engines that had upgrades for marine use. Therefore, coupling an automobile engine to a boat is primarily a packaging challenge. It connects an inboard engine to a fixed gearbox on the propeller shaft or a stern drive.

What Is the Difference Between Marine Motors and Car Motors?

How to Put a Car Engine in a Boat

Replace your old marine engine with a new one if you will be doing any work on your boat during this process. When comparing the two, the cost of vehicle engines tends to be lower than marine engines.

Will an auto diesel fit in my boat?

Will an auto diesel fit in my boat

In reality, many marine diesel engines are little more than modified automobile or truck engines that have been “marinated.” On the other hand, marinizing a car or truck engine could be difficult. The cooling system, the exhaust, and the transmission are the three main faults that need to be resolved.

You must use a heat exchanger as part of the car’s cooling system. The metal components must be compatible and not be vulnerable to galvanic contact.

It should be sufficient to use a heat exchanger from a marine engine with a similar or higher power rating. As a result, the seawater side of the heat exchanger necessitates the installation of a raw water pump. A rubber impeller-type pump, driven by the crankshaft pulley, is typically used in this application.

The cooling system modifications are not completed at this point. To run the engine, a water-cooled exhaust manifold and a wet exhaust system will be required.

Unfortunately, the water-cooled manifold will need to be bolted to a custom marine cylinder head to function properly. Using a standard automotive cylinder head will not suffice.

It will take careful engineering to ensure that the amount of water discharged through the exhaust pipe and muffler corresponds to the amount of power generated by the engine.

A ship does not need an automobile transmission. 

  • The drive shaft of the transmission must be compatible with the engine’s output shaft.
  • The gear reduction ratio (gear ratio) must be compatible with the engine requirements.
  • The output of the transmission must be compatible with that of the motor.

There are minor difficulties, such as the lack of a suitable instrument panel for the engine, which will require fabrication. At a minimum,

You will require an oil pressure gauge and a temperature gauge unless and until you can match these to the current sending units. So, you must send teams.

In addition, we would strongly recommend an hour meter (to monitor engine usage and maintenance intervals) and possibly a tachometer.

Changes to the ignition (starter) circuit may be necessary.

A marine engine comes with a governor, which maintains engine speed at an acceptable level regardless of engine load (the equivalent of cruise control in a car). As a result, it will be necessary to adjust the engine or fuel injection pump to achieve the desired result. However, it is not required; in the absence of a governor, the engine’s speed will vary slightly in response to changes in load.

Inboard Boat Engines Are Not Car Engines

There are significant differences between marine inboard and automobile engines, so read on before you believe a crate engine from an automobile manufacturer is a beautiful deal and solution for your repower project.

In that case, the engine could suck wasted cooling water back into the cylinders, resulting in several difficulties, the most serious of which is corrosion and hydraulic lock-up, in addition, due to the enormous weight that a marine engine supports. Their building must be different. 

Except for trawler engines, a marine engine has different specifications despite its similarities to a vehicle engine.

Another point is that temperatures stabilize in a car or any automobile. Most marine engines get their cooling water directly from the environment they operate. If they use in the ocean and reach a temperature of 180 degrees, the seawater begins to desalinate, and you end up with a salt block with all the vapor pockets.

A typical automobile engine usually runs at a water temperature of 220 degrees when looking at a water temperature. That is not possible in a boat.

Bottom line

Automobile engines are unsuitable for boats. Every part of the engine, except the block, requires a different camshaft. 

You must line the exhaust manifold with water to prevent excessive heat from building up and causing engine room fires. Both the alternator and the starter motor must be distinct to prevent sparking, which would result in the spectacular, exhilarating, stirring, and lethal explosion of the boat.

It would be best to modify the carburetor to avoid fuel dripping into the engine and bilge. Oil venting must be different to prevent death by explosive oil mist.