Nowadays, people wish to have hydraulics in their cars for more speed and a broader force range. But they need clarification because they must learn how to implement car hydraulics. No need to stop yourself because after going through this blog post, you will be more confident and acknowledged. Now we will go through all tips, tricks, and necessary strategies on how to build a model car with hydraulics that you must fulfill while implementing hydraulics in your model car.
Follow the below steps.
- Understanding the Basics of Hydraulics
- Gather the Necessary Parts and Tools
- Assemble the Chassis and Suspension
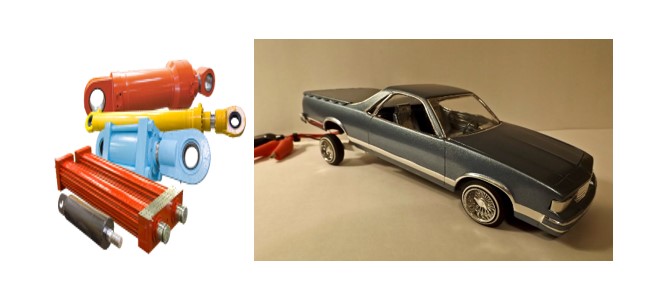
- Install Hydraulic Motors and Pumps
- Connect Hydraulic Lines and Controls
- Paint and Add Details to the Car
- Test and Troubleshoot the Hydraulic System
- Take the Model Car for a Test Drive
Now, let’s dive into the details;
How to Build a Model Car with Hydraulics
Understanding the Basics of Hydraulics

When doing something new, learn about it, understand its basis, and study its pros and cons. Consider it my advice.
Thus, before using hydraulics in your car, understand how it works:
- All fluid is stored and preserved in F1.
- When we apply them hydraulically, they push all fluid from F1 toward F2.
- During it, all mechanical energy gets converted into hydraulic fluid power.
- Using this energy, hydraulic lift our cars.
Gather the Necessary Parts and Tools
If you are doing any experiment, the first thing to consider is to collect the correct parts and tools according to your work.
Now I am going to provide you with the list of tools and parts that should be present with you:
Tools:

- A proper seal kit.
- Screwdriver.
- Punch.
- Rubber mallet.
- Torque wrench.
- Pliers.
- Emery cloth
Parts:

- Fluid.
- Reservoir.
- Hydraulic pump.
- Electric motor.
- Valves.
- Hydraulic cylinder.
Assemble the Chassis and Suspension
After grabbing all your parts and tools next step, you have to take is to assemble the chassis and suspensions.

If you are unaware of these words, then no need to search them out. I will guide you.
Every car part in your kit will be known as chassis, like the engine, wheels, suspension systems, brakes, axles, E.T.C.
Take your car kit and read its instruction. They have the right all ways to assemble and join your car kit.
Install Hydraulic Motors and Pumps
Now, after aligning the chassis and suspension next step is to install hydraulic motors and pumps.
There are 4 ways to install it:

- You can install a hydraulic motor and pump by using a screw.
- You can install hydraulic by simply making hydraulic adhesive to the model car.
- You can use a hydraulic pump to put the hydraulic into the model car.
- Lastly, you can use a battery-operated hydraulic pump for installing a hydraulic in-car kit.
Connect Hydraulic Lines and Controls
After connecting the hydraulic with the car, it’s time to connect lines and control.

You must get the wires from the hydraulic control box and attach them to a circuit.
You can go with a shorter wire to bounce your car. It’s totally up to you to connect shorter or longer wires.
Note that don’t start using it just after fitting the hydraulic. Let it sit and fix properly.
Paint and Add Details to the Car

After connecting your car kit to the hydraulic, the next step is to spread some colors of your car.
You can go with any color according to your wish. Take a paint and start painting your model car.
Take your car in your hand and check its detailing deeply. Check every screw and nut. Ensure that its detailing is perfect; thus, it will work perfectly.
Test and Troubleshoot the Hydraulic System

Now, I am going through some ways to test the hydraulic system.
- Cold oil.
- Air in the system.
- Check damaged or dirty components.
- Restrictions in lines or filters.
Now, I am going to discuss how to troubleshoot the hydraulic:
- Check the Temperature of the tank line.
- Start checking the Case Drain Lines and Suction.
- Check the Relief Valve (Tank Line Temperature).
- See outlet Oil and Heat Exchanger’s Inlet.
- Check the Check Valve (Tank Line Temperature).
Take the Model Car for a Test Drive
After putting hard work into the model car, now give it to rest for some time.

Then, start hydraulic the model car. If you notice any distractions, then check it again and fix it.
Your test drive should be perfect.
Maintenance and Troubleshooting Tips

If you notice that the car is not working properly, then go through these steps:
- Prepare yourself for repairing.
- Get knowledge, then make a damage control plan.
- Make a complete symptom description.
- Copy the symptom.
- Perform maintenance.
- Narrow it.
- Take defective parts out, then repair them.
- Retake a Test.
Expert Advice
The cars built with hydraulics are known as lowriders. People are desperate to use it because of hydraulic. The car moves their car side to side, back and front. Applying the points discussed, you can build a hydraulic car from your car kit.
After building a hydraulic, give your car a test drive. Check if there is any problem. If their system is working well, then, no, you can go with it.

James Carter is an automotive blogger, reviewer, and technology enthusiast based in the USA. With a deep passion for cars and years of experience following the automotive industry, James focuses on delivering honest, well-researched content that helps readers make smarter decisions.