Drawing a classic car is fun and rewarding for car enthusiasts and artists. You can do it easily for an hour, whether your goal is to capture a vintage car’s beauty and elegance or enjoy drawing cars. This blog post will guide you step-by-step and show you how to draw a classic car in just a few easy steps.
These are steps that I am going to discuss briefly:
- Prepping the canvas – materials needed, setting up the workspace
- Sketch the outline – creating the shape of the car
- Add details – windows, tires, headlights
- Shade and highlights – creating the 3D effect
- Add color – choosing the right colors for the classic car
- Taking it to the next level – adding reflections, highlights, and shadows
- Finishing touches – adding the details to make it look realistic
- Finishing up – erasing any mistakes, touching up any areas
How to Draw a Classic Car
Prepping the Canvas
Before drawing your classic car, gather materials and set up your workspace. You will need a
- sketchbook
- drawing paper
- a pencil
- an eraser
- colored pencils
- markers.
Once your materials are ready, find a comfortable and well-lit space to work in. Ensure you have enough room to spread your materials and move your hand freely.
Sketch the Outline

Start by sketching the outline of the car using light and gentle strokes.
You can use the above images to get the car’s shape just right. Pay attention to the proportions and angles of the car, as these will determine the overall look and feel of your drawing.
Add Details

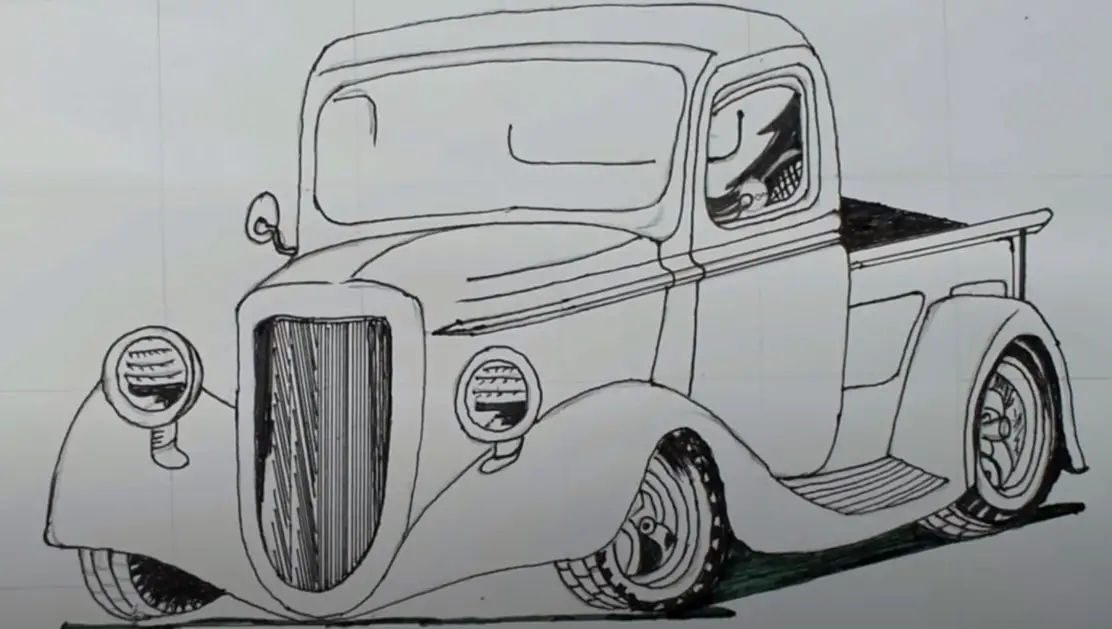
- You have to extend the line. As shown in picture 1.
- Draw a square; thus, it will look into the front mirror. As shown in picture 2.

- Draw a circle; then, draw a circle inside the first circle again.
- Draw a horizontal line inside the second circle. It will look at headlights. As shown in picture 3.
- Repeat the step and draw the second headlight. As shown in picture 4.

- Draw a square but curve from the sides. Draw 2 more squares, but their fourth side should be the same, as shown in picture 5.
- Draw Criss cross lines inside the last square, then fill it with a pencil, as shown in picture 6.

- Draw a circle in the tire place of your sketch car, as shown in picture 7.
- Draw another circle inside of the first circle. As shown in picture 8.
- Draw mini semi-circles in the last. As shown in picture 9.
Once you have the basic outline of the car, start adding details such as the windows, tires, and headlights.
Use the above images to help you get the details just right. Take time and work slowly to capture the classic car’s look and feel accurate.
Shade and Highlights

Next, start adding shade and highlights to create a 3D effect. Use a darker pencil or marker to shade the areas of the car that are in shadow and a lighter pencil or marker to add highlights to the areas that are catching the light.
Add Color

Once you have shaded and highlighted your classic car, it’s time to add color.
Choose colors that are appropriate for the era of the car and that match the reference images you are using.
Use light and gentle strokes to build up the colors gradually, and make sure to blend the colors for a smooth finish.
Finishing Touches

To finish your classic car drawing, add any final details to make it look more realistic.
This could include exhaust pipes, door handles, or other small details that make the car look complete.
Finishing Up
Once you are happy with your classic car drawing, it’s time to erase any mistakes and touch up any needed areas.

Use an eraser to remove stray pencil marks or smudges and a pencil or marker to add final details.
Drawing a classic car may seem daunting at first, but with some practice and patience, you can create a beautiful and detailed drawing that captures the essence of these vintage vehicles.
So, gather your materials, find a comfortable workspace, and start drawing your classic car today!
Learn More: How to Draw a Car from the Back
Taking it to the Next Level
Consider adding reflections, highlights, and shadows to make your classic car drawing pop. These details will give your drawing a more realistic and polished look.
Use a light pencil or marker to add highlights and reflections and a darker pencil or marker to add shadows.
Expert Opinion
This article provides a step-by-step guide on how to draw a classic car. The article covers prepping the canvas, sketching the outline, adding details, shading and highlighting, adding color, taking it to the next level, finishing touches, and finishing up.
The guide provides tips for creating a realistic and polished drawing of a classic car, including paying attention to proportions and angles, adding reflections, highlights, and shadows, erasing mistakes, and touching up any areas.
With practice and patience, anyone can create a beautiful and detailed drawing of a classic car that captures the essence of these vintage vehicles.

James Carter is an automotive blogger, reviewer, and technology enthusiast based in the USA. With a deep passion for cars and years of experience following the automotive industry, James focuses on delivering honest, well-researched content that helps readers make smarter decisions.