Drawing a train car can be a fun and rewarding experience for anyone interested in art or transportation. Whether a beginner or an experienced artist, follow these steps to create your train car masterpiece. After going through this blog post on how to draw a train car, you will feel like an artist. These are the steps that we are going to perform:
- Gather the materials you need – pencils, ruler, eraser, and paper
- Sketch an outline of the train car
- Draw the details of the train car – such as the windows and doors
- Draw remaining cabins
- Shade in the shadows of the train car
- Add the smoke from the train car
- Add any additional details to the train car
- Clean up errors and erase any unwanted lines
How to Draw a Train Car
Step 1: Gather the materials you need – pencils, ruler, eraser, and paper
Once your materials are gathered, you can start drawing your train car. You have to grab all your necessities:
Materials:
- Pencils
- Ruler
- Eraser
- Paper
Step 2: Sketch an Outline of the Train Car

- Draw a rough outline of the train car using your pencil and ruler.
- Start by drawing a straight horizontal line.
- Draw 5 circles of different sizes as shown in the above picture.
- Draw another horizontal line cutting the drawn circle, as shown in the above picture.
Don’t worry too much about getting everything perfect at this stage – you’ll refine the details in the next steps.
Step 3: Draw the Details of the Train Car


Once you have the basic shape of the train car, start adding the details, such as windows and doors. Use your ruler to create straight lines for the windows and door frames, and add smaller details like handles and hinges. All you want to do is:
- Draw a 90-degree angle using the scale shown in Picture 1 above.
- Draw another 90-degree angle. As shown in picture 2.
- Now add more lines, making it look like a square and rectangle. As shown in picture 3.
- Now draw another two parallel lines at the end of the drawn rectangle. As shown in picture 4.
- Now draw a rectangle and curve the same upon it. Like a Himney of the train. As shown in picture 5.
- Draw a rectangle inside a cabin. It will look at the window.
Take your time with this step to ensure that the proportions of your train car are correct and the details are well-placed.
Step 4: Draw the remaining cabins


To complete your drawing, add a background that gives context to the train car. All you have to do is:
- Use your pencil to draw a square. As shown in picture 1.
- Draw two parallel lines that meet in ending up on the drawn square. As shown in picture 2.
- Draw a rectangle. It should look at the door. As shown in picture 3.
- Draw two squares around the door. It will look through windows. as shown in picture 4.
Step 5: Shade in the Shadows of the Train Car
Now that you have the basic shape and details of the train car, it’s time to add some depth and dimension to your drawing.
Using your pencil, shade in the areas of the train car that would be in shadow if there were a light source.
This will give your drawing a more realistic and three-dimensional look.
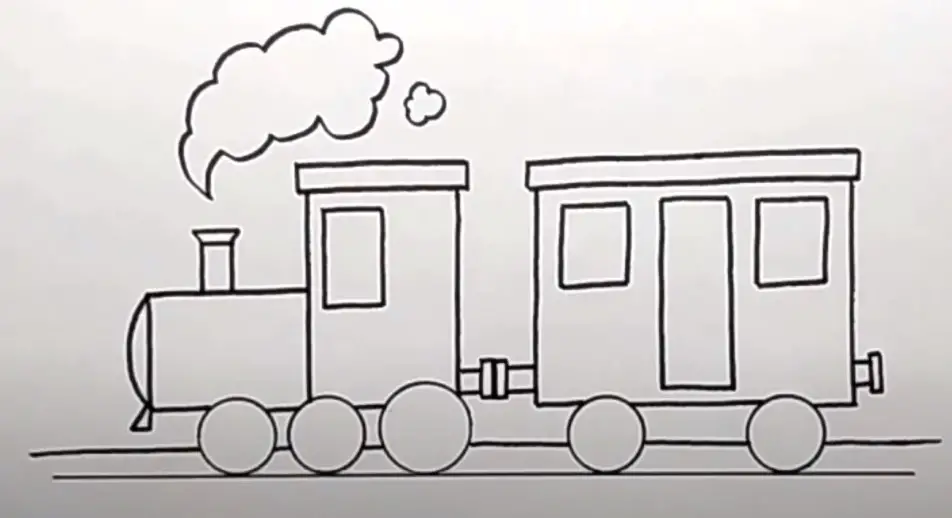
Step 6: Add the Smoke from the Train Car

Trains are often depicted with smoke billowing out of their chimneys. To create this effect, use your pencil to draw wispy lines that rise from the top of the train car.
Make sure to vary the length and thickness of the lines to create a more realistic effect.
Step 7: Add any Additional Details to the Train Car

Once you have the basic elements of the train car and the background in place, you can add any additional details you want to include.
This could be anything from graffiti on the train car to passengers looking out the windows. Use your imagination and have fun with this step!
Step 8: Clean up Errors and Erase any Unwanted Lines
Finally, step back and look at your drawing as a whole. If there are any errors or lines that you don’t like, use your eraser to clean them up. Once you’re satisfied with the overall look of your drawing, you can consider it complete.
My Opinion
In conclusion, mastering the art of drawing a train car involves understanding the principles of perspective, proportion, and detailing. Any aspiring artist can create a convincing representation with practice, patience, and reference to real-life train cars. The journey may be intricate, but the reward is an impressive enhancement of one’s drawing skills.

James Carter is an automotive blogger, reviewer, and technology enthusiast based in the USA. With a deep passion for cars and years of experience following the automotive industry, James focuses on delivering honest, well-researched content that helps readers make smarter decisions.