How to Remove an Over-Tightened Oil Plug | 5 Different Methods Shared

0

Removing over tightened oil plugs can be a difficult task. First, loosen the plug with an adjustable wrench to avoid damaging the threads. Apply penetrating oil to reduce the surface around the pin to provide maximum lubrication. Next, use vise grips to hold the head of the bolt and use a socket wrench to turn the shaft clockwise until the plug does remove. Let’s learn how to remove an over-tightened oil plug.

What To Do When You Remove Over Tighten Oil Plug?

How to Remove an Over-Tightened Oil Plug

Over-tightening any hardware can cause an issue, and the hardware may bend or break. When you over-tighten an oil plug, it can put too much pressure on the threads, and when the time of change the oil is near, you may have problems delivering oil. It can cause the lubricant to heave, which can cause the engine to seize when you start it. Of course, it’s best to avoid it.

How to Remove an Over-Tightened Oil Plug

How to Remove an Over-Tightened Oil Plug

Remove An Over-Tighten Oil Plug Using A Hex Key:

The secret to removing an over-tightened oil plug with a hex key is to get it wet. I recommend using a spray bottle to moisten the area around the stuck hex key. Also, use a lot of force when you twist the hex key. It should loosen the plug. If it doesn’t work, find someone stronger than you, but don’t use too much strength as you might break the key in the hole!

Remove An Over-Tighten Oil Plug Using Lubricants:

If you’re wondering how to remove an over-tighten oil plug, you’re in luck! The lubricant method works well in these situations. It would benefit if you operated the right amount of oil continuously. Too much, and your plug will be a little harder to remove. 

Too little, and it will fall out, and you won’t be able to get it back in. You can approach this is to turning left six times and then right once. Then, please carry out the stopper and substitute it with a fresh one. This method works best if you keep your engine well lubricated, and it’s best to speak to a mechanic before you try it. 

Remove Over Tighten Oil Plug Using Gator Grip:

If you need to remove a stripped oil plug:

  • Use Gator Grip pipe wrenches or any other brand of a pipe wrench to grab hold of the stripped oil plug.
  • Install Gator Grip T-Handle Top Oil Plugs by tightening them into the drain plug hole.
  • Use a wrench to firmly grasp the T-Handle Top Oil Plug handle and turn it counterclockwise to loosen the drain plug. If the bolt does not move, use a ratchet to loosen the bolt.

It will save you time and money compared to hiring a mechanic to do the same job. Please don’t break the handle off. Use a wrench to firmly grip the top of the T-Handle Top Oil Plug to loosen the drain plug. And please also note that this step is if you need to remove a stripped oil plug.

Remove And Over Tighten The Oil Plug Using Socket Wrench:

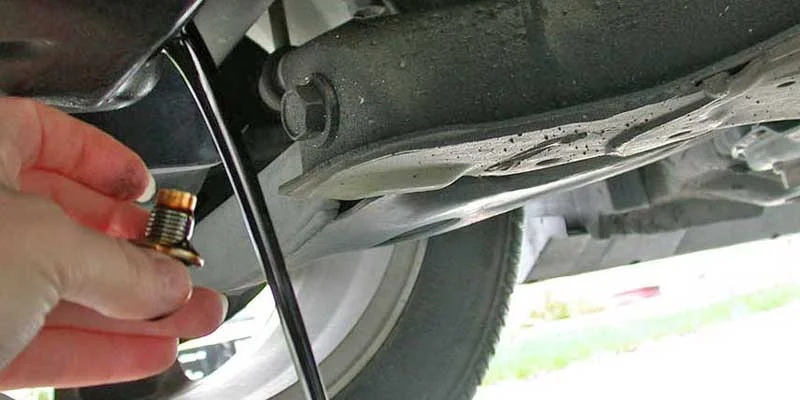
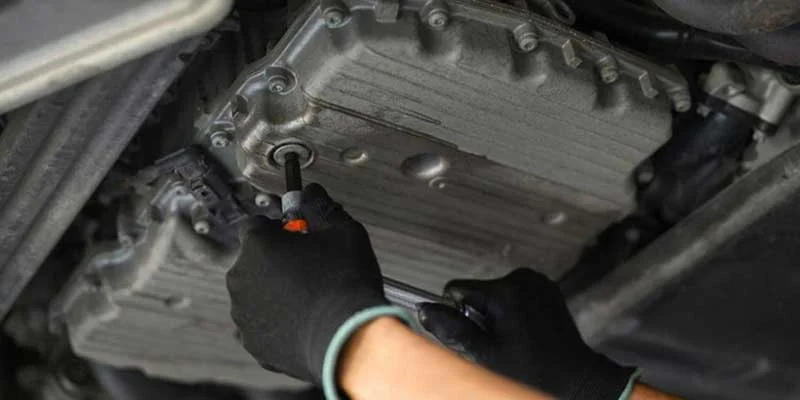
Using a socket wrench, remove the oil plug by turning the wrench counterclockwise to loosen the plug. It’s helpful to have a friend help pull the plug out with a wire. Remember to turn the twist to the left. If you turn it right, you might damage the oil pan or engine components. Try a ratchet or another socket wrench with a different drive size if the wrench doesn’t loosen the oil plug. Proceed with caution and contact your local garage for further assistance.

Remove And Over-Tighten The Oil Plug Using A Bolt Extractor.

There are many ways to over-tighten an oil plug, but it is often easy to fix with a bolt extractor. A bolt extractor can use to get the pinout. A pin is a type of simple device that is circular. The initial aim of the plug is to block a fix.

As you can see, it is effortless to over-tighten an oil plug and cause a lot of trouble for yourself. The tool for removing such a plug is a bolt extractor. It is a tool with a hollow device on one end and a bolt head. 

Tips to Remove an Over Tighten the Oil Plug

Tips to Remove an Over Tighten the Oil Plug
  • Ensure that the engine is cold when starting the procedure.
  • Use a bungee cord to hold the socket in place.
  • To pound the socket, you can use a rubber mallet
  • Utilize competent oil to reduce the oil stopper.
  • When you try to remove a car oil plug with a wrench only to find yourself in a situation where the twist starts to bend, you are probably not alone.
  • A typical explanation of this problem is that the pressure builds up when you over-tighten a bolt, and the bolt starts to bend.

Frequently Asked Questions

What’s The Best Way To Remove An Over-Tighten Oil Plug?

  • Utilize a crash dryer and warm it to extend the metal region. You operate a couple of pliers to turn it off. 
  • Get a mallet; place it upside down on top of the wrench handle, then place the flat tip of the wrench under the over-tightened bolt, and swing away to loosen it.

What Is Your Best Tip To Remove And Over-Tighten The Oil Plug?

Place a rag around the plug, put a socket on, and let it sit for an hour or so to loosen it.

How Can You Remove A Stripped Oil Drain Plug?

  • Use a rubber glove to get a better grip on the plug.
  • Use a hydraulic press.
  • You can use a hammer to whack the plug’s center (while removing the drain pan).

How Do You Remove The Rounded-Off Oil Drain Plug?

  • Use a medium-size flathead screwdriver to remove it.
  • Use a smaller wrench to get some leverage.

Conclusion

There are many ways to remove an over-tightened oil plug available here. These include using a proper tool, like an oil-plug wrench, screwdriver, or even a pipe clamp. When these choices cannot perform for you, dig minor fixes in the lid and base of the skull of your plug. Over time, this will either loosen up the plug or break it in half. You may try one of these to succeed when removing an over-tightened oil plug!

How to Remove a Bolt in a Tight Spot | Different Methods Explained

0

Removing a bolt can be a complex procedure for some people, but the truth is that it is not the most challenging procedure in the world. There will be times when you observe yourself in a position where you need to remove a bolt from a tight spot. 

Maybe the bolt is rusted, or perhaps you are trying to remove the bolt without a lot of damage to the surrounding area. This blog will focus on some of the steps involved in removing a bolt and some simple tips to help you do this more efficiently.

How to Remove a Bolt in a Tight Spot

How to Remove a Bolt in a Tight Spot

A good bolt removal tool can solve this problem! A hexagonal bolt removal tool can help you get a stripped hex bolt loose when you need it. The most common hex bolt is the hex socket head. It’s also the most common bolt type. If you’ve got a stripped one, you can use the tip of the hex bolt removal tool to grip the shaft and pull it from the object you’re trying to remove from it. 

The center of the hex bolt removal tool has a hexagonal shape, which means it will fit into any bolt or nut with a hexagonal head. It helps the tool grip onto whatever you’re trying to remove the bolt from it. 

Different Ways to Remove a Bolt from a Tight Spot

Different Ways to Remove a Bolt from a Tight Spot

Heat and Force

Most bolts will unscrew themselves with heat applied to the head. As the bolt heats up, the metal expands and becomes easier to turn. You’ll need to get it hot enough to soften the metal enough to loosen, but not so hot that it damages the threads. 

If you have a torch, aim it at the head of the bolt and leave it there long enough to heat the lead-up. These are the two most acceptable alternatives if you have access to a barbecue lighter or MAPP gas torch. You may need a pair of pliers to adjust the nut while heating. Once the head is hot all the way around, try your wrench again. 

Prolonged Chisel Span

The strategy is uncomplicated. First, drill a hole in the bolt head. Put the chisel in the chuck as you usually do it, and then hit the spot in the bolt head. You can use the drill press to assemble the hole. Use the chisel bit in the chuck and drill out the bolt head.

Depending on the bolt head size, you can tell the chisel bit to go in one stroke or two strokes. You can make the hole in the bolt head bigger with the chisel bit. Check out the picture below!

Ratcheting Box + Wrench

If you are talking about a bolt too tight to get a regular wrench on, you need a ratcheting box and wrench—these styles to get on those tight spots. There are two typically used techniques to reduce nuts and bolts.

The first one is to reduce the nut just enough to spin freely, then use a regular wrench to loosen the nut.

The second technique reduces the nut as significantly as feasible with an expected twist. Then place the ratcheting box-end wrench as far around the bolt and tighten it. The ratchet head will then turn the bolt just enough to loosen it.

Lubricant

If you’re working in a tight spot, sometimes you need to remove bolts to get to a particular area. It can be challenging to get a wrench on these bolts, and you may not have the right tool for the job. If you have one of those bolts, here’s a great and cheap way to remove that bolt! First, you need to get WD-40, a hammer, and a self-lubricating wrench. 

Spray the bolt with the WD-40, then place the wrench over the bolt and strike it with the hammer. It will reduce the bolt, and you’ll be capable of removing it with alleviation!

Ensure Safety

Be sure to scrap safety gear when attempting to remove a stuck bolt. Foremost, you’ll warm the bolt and flow in some liquid soap. Put on safety goggles and grab a wrench. When it warms, the wrench tightens the bolt. Put the twist as close to the bolt as possible. 

Frequently Asked Questions

How Do You Loosen A-Bolt If You Can’t Reach The Nut?

A nut on the opposite end typically holds the bolt in place, which tightens with an adjustable spanner. If the spanner can’t reach, it’s best to thread an extension bar onto the tool for extra reach. For added torque, use a ratchet-head wrench or T-handle wrench. If all else fails, use a pipe jerk with a wide jaw to generate torque from the side. 

What Tool Can You Use To Remove A Rounded Bolt?

A rounded bolt is a bolt that has a head that is either hemispherical or domed. A round bolt can remove by using a puller, which operates to remove rounded bolts from blind holes. The purpose of the puller is to provide an adequate grip on the bolt as it attempts to loosen.

How Do I Remove A Bolt That Had Its Head Broken Off?

A bolt that has had its head broken off can remove with a pair of pliers and a screwdriver. The pliers will grab the broken-off section and twist it back and forth until it falls free so that the screwdriver blade can use to unscrew the remainder of the bolt.

Conclusion

There are many objectives why you might need to remove a bolt from a tight spot, and the reasons you need to do this will determine the method you will want to use. If you want to remove a bolt from a tight spot, you need to use a technique to get it out without damaging it or the part you are withdrawing from it. 

We hope we have promoted you in understanding the different methods you can use to remove a bolt from a tight spot. We recommend that you practice these methods with a bolt not attached to anything before using them on a bolt that holds something together.

How to Release Freon from Car | Simple 3 Step Guide by Expert

0

To release Freon from a car is a simple process, as you will get to be a professional car mechanic. Awareness of how to remove a Freon gas from an air conditioner will be a helpful tip, and same as you can do it to your car. Releasing a Freon gas from a car is a helpful DIY tip that can save your money and give you more knowledge about your car’s AC.

If you follow the simple steps to release a Freon from your car AC, you can easily do it in your home. 

How to Release Freon from Car

How to Release Freon from Car

If you want to release the Freon gas from your car AC, you should have the recovery machine, as this machine can recover and recycle the cooling elements in the vehicle. When the recovery machine recycles and releases the coolant, it’s done. 

There are mainly three steps to remove Freon from a car.

Step 1: Connect the service port and search for the low-pressure service port

After taking safety precautions:

  • Bring the recovery machine in front of your vehicle.
  • Link the recovery machine to the service hoses of the car air conditioner service ports.
  • After connecting service hoses to the car AC port, search for your car’s low-pressure service port.

The easy way to find out the low-pressure service port is to follow the line assembly and hoses from the backside of your car AC and compressor to the cylinder.

On the back of your AC compressor, you will find the low-pressure service line if you follow the hoses and the line assembly. It would help if you remembered two low-pressure and high-pressure lines. The high-pressure line is smaller in size than the low-pressure line.

The low-pressure service port is not in the same position and on the same line in every vehicle. The low-pressure service port is on the AC compressor in most vehicles, so you should check in your car. 

Step 2: Start the recovery machine.

When you find the low-pressure service port and connect the recovery machine to the air conditioner service port, the working of the recovery machine will start working.

The coolant recovery machine will work simply by pulling out all the Freon gas or coolant from your car AC. When you connect the recovery machine’s Schroeder valves to the AC, it will produce a vacuum and absorb all the Freon gas out of the car AC system. 

Now run the recovery machine, and it will then release the Freon vapors and non-condensable gases from the AC of the car. Still, there will be some amount of the cooling substances in the liquid form, but it will not cause any harm, and the recovery machine will convert the gas into vapor.

You have to allow the recovery machine to operate many times to the system pressure, and the recovery machine will change the liquid into vapor. 

The Freon will then release from the internal pressure. The recovery machine will switch off automatically when the system is empty. Leave the recovery machine as it is because when the air pressure increases in the system, it will restart and pull the vacuum again.

Step 3: Run the recovery machine

The final stage in getting the Freon gas from the car AC is disconnecting the recovery machine in the car AC from the service port. Close the service hose valves before the disconnection of the recovery machine.

Otherwise, your car AC will get damaged, and then your car AC will not be able to operate and will not blow cold air when the car is moving or in a stationary state. This is why you have to be very cautious while practicing the whole procedure.

Frequently Asked Questions

How to remove Freon from car AC?

The blue or low sides need to show a vacuum that reads at or below zero. If it does not work like this, there is a leak that you should get repaired before doing the process forward. Run the pump for thirty minutes, then turn the pump off and turn the red and blue gauges; this will complete removing the Freon from the car AC.

How do you remove Freon?

The only way to get rid of Freon gas from HVAC systems is to use a declaimer. The machine’s function is to catch the Freon, strain out the impurities, and store the gas for future use because it is unlawful to discharge the Freon gas into the environment. It contains fluorocarbons that are harmful to the atmosphere.  

What will be the result if you have too much Freon in your car AC?

As a common downside, the excess of Freon gas can stop working of the compressor at its capacity. In some cases, the extra Freon gas can accumulate inside the compressor of the AC and results in overcooling and undercooling. In the worst situations, the Freon gas can even harm the car’s internal machinery and compressor of the AC car.

Can you discharge Freon gas into the atmosphere?

To reduce Freon depletion, the US environmental protection department prohibits releasing the Freon gas into the atmosphere during the servicing of the car AC process in homes, buildings, plants, and other locations. 

Conclusion

Releasing the Freon gas from your car AC is not the complex process to do as you may think. If you monitor the step mentioned above, you can easily eradicate the Freon from the car. If you use the car recovery machine for this process, you should be extra careful while releasing it. 

Finding the recovery machine is an overwhelming task due to some reason. Most areas need certification, and permission t remove the Freon gas from the car AC to protect the environment and ensure the process goes properly. Alternatively, you can also remove the Freon gas from your home or car AC without the recovery machine and with the help of a car vacuum pump.

How to Register a Financed Car | 4 Steps You Don’t Know Before

0

Suppose you want to register a financed car, especially in the USA. In that case, you should possess evidence of your identity, your title, auto insurance documents, and the payment receipt for your local DHSMV location. Those living in the United States have to get the VIN inspection, get new license plates and have an official odometer reading done for one to two years.

In addition to this, you also have to make the payment on possible sale tax on the vehicle out of state. This post will get the steps to register a financed car.

How to Register a Financed Car

How to Register a Financed Car

The residents of the USA have to register their vehicles like cars whenever a person purchases or gives to them. The registration process can differ in different states and depends on getting the car from a dealer, private company, or private company.

Dealer purchases

The authorized dealers have the permission to issue the registration document or the license plate, do all the processes done in terms of titling and fees, and charge the initial registration fee at the time of purchase. It will be ideal and beneficial for the cardholder to request the dealer to do the electronic and automatic registration and the electronic filing system.

Moreover, the dealer can provide you with the document for the registration and transfer the vehicle deed in 30 days or less than this. If the dealer cannot do this process within the required deadline, you should call the motor vehicle department to proceed further. The motor vehicles and highway safety department will contact you in this regard, and you will get the hold in your county.

Leased vehicle registration

The dealer doing your car registration process will finish the titling process for their clients. It is important to note that the fees required for leasing and registration of a vehicle are primarily on the higher side in terms of cost than owning the vehicle.

Initial taxes and registration fees

The contract for the registration of the licensed car does not contain the fees and title of the car. If this is the case, the trader can ask you for the exact dollar amount regarding paid fees. The dealers can also add the extra filing fees for the registration and fee of the vehicle, but these charges should be enclosed separately while doing the registration process.

Private party purchases

While buying the car privately, you have to fill out the documents and forms for registration and titling on your own and then submit them to the county collector’s office. You have to complete the documents for a sale document with the previous owner to keep a record of the purchase. The seller must file this form to the tax collectors’ office, but you should have a copy of the form to record the agreement.

Follow the below-given steps for registration:

  • Write the title of the car with the previous owner
  • Ensure to check the VIN on the vehicle that it should match the title’s VIN. If the car does not contain the FL title, you must opt for the VIN inspection
  • fill out the mileage document and the odometer; it only implies on the vehicle that is less than 10 years old
  • Now submit the complete document of title to the county’s tax collector’s office to give all documents to the agent
  • You have to present proof of being insured in the USA
  • You should make the payment for the registration of the car in terms of fees
  • Titling fees
  • Fee for registration
  • County fees
  • Possible temporary license plates fees
  • Get the license plates in addition to registration stickers

Documents Needed for the Registration of the Financed Car

Documents Needed for the Registration of the Financed Car

Like any other state, you have to show all the essential documents like license plate and certificate of title and bring them all to the regional locations. With the use of these documents, the department of the motor will register the transfer deed with out-of-state essentials.

The following parties are in the registration of the car:

  • County tax collector’s office
  • Any police officer
  • Any car licensed dealership
  • DMV inspectors
  • Notary public
  • An active-duty military office

Frequently Asked Questions

How do I register a car without having the title in the USA?

The drivers cannot register a car for on-road use without a car title in the USA. The Department of Highway Safety and Motor Vehicles provides a form for requesting a duplicate title if you do not have the vehicle title in the USA.

Can you drive a car you bought home without registration in the USA?

You can drive a car for up to 30 days in the USA without an official license plate. It is against the rules and regulations in the USA to issue a second temporary tag.

Can you register a car in Florida?

Suppose you want to get the car’s registration quickly or renew a vehicle or vessel registration. In this case, you can choose the online process for GoRenew.com, where motor vehicle registration is easy, like registration renewals for motor vehicles for one to two years or even more.

In Florida, can a non-resident register a car?

If you are not a resident of Florida and purchase a new car or old vehicle, you should apply for temporary registration tags. You can proceed with the process by visiting the county tax collectors’ office and showing the evidence of insurance. In addition, you are legally responsible for the Florida sales tax on the vehicle.

Conclusion

To register the financed car in the USA, follow the steps discussed above either in the state registration or the registration out of state. You should get a driver’s license from an insurance company to complete the process. If you don’t have the physical out-of-state registration and title, you should contact the tax collector office to resolve the registration process.

Furthermore, it is also a fact that registration of the financed vehicles or a car varies in different states and also requires different types of documents and papers according to the rules prevailing in the states. 

How to Put the Rearview Mirror Back on the Ball Mount | Expert Guide

0

The ball mount is an instrument that carries the rearview mirror in position. It connects to the windshield with suction cups. The ball mount has a metal ball attached to the mirror bracket. 

When carrying out a roadway journey, it is vital to confirm that everything in your auto is in functioning demand. It includes checking the mirrors to make sure you can see what is behind you. If you find that your rearview mirror has come off of the ball mount, don’t worry! It is a relatively easy fix.

A rearview mirror can be a tremendous asset when you notice what is after you. It can use for all kinds of things, from changing your direction to keeping the ball in the air.

There are rare paths to position a rearview mirror back on a ball mount. The most common way is to use the adjustment screws on the mirror to make minor adjustments until it is in the correct position. Another way is to use the screws on the back of the mirror to adjust it. If these methods don’t work, there is usually a hole in the bottom of the ball mount to put the mirror back in place.

How to Put the Rearview Mirror Back on the Ball Mount

How to Put the Rearview Mirror Back on the Ball Mount

Process:

If you have an older car and the ball mount doesn’t fit properly, you may need to replace it. Regardless, if you own a more recent model, you shouldn’t have any issues establishing one. Just follow these steps:

  • Start by separating the screws from the existing ball mount.
  • Remove the old ball mount.
  • Place the new ball mount into the hole in your windshield. There should be a few suction cups on their back that adhere to the glass.
  • Firmly press down on the ball mount to attach it to the windshield.
  • Screw the new ball mount onto the bottom of the frame

If you have an already installed and need to replace your rearview mirror, follow these steps:

Remove Your Rearview Mirror

First, remove your current rearview mirror from its mounting location. Then, take off the Mount hardware. And install the new one.

Install the New Ball Mount

Next, use some tape to hold the new ball mount until you’ve finished installing it. You don’t want to damage the ball mount.

Replace Your Rearview Mirror

Once you’ve completed step 2, reattach your rearview mirror to the new ball mount. You may desire to contemplate substituting the actual ball mount with an integrated rearview mirror.

Equipment for putting the rearview mirror back on the ball mount

Mirror clips:

Mirror clips use to hold the rearview mirror onto the ball mount. They are also used to attach the mirror to the vehicle.

The clip has two parts. One part is the base which attaches to the ball mount. And then the part is the clip itself. The clasp is connected to the ground when extracting the pin from the ball mount. Then when you connect the pin to the ball mount, the bottom comes off the ball mount, and the clasp stays on the ball mount. It allows you to change out the clip for another one quickly.

Suction Cup Mount:

A suction cup mount can put the rearview mirror back on the ball mount. Which attaches to the windshield and the mirror can be attached. There are two styles of suction cups, one for the left flank and one for the right side. They push out of rubber, and they arrive in diverse scopes relying on the length of the door. To eliminate the suction cup mount from the ball mount, pull up on the suction cup until it pops off.

Frequently Asked Questions

How is The Mirror On The Ball Mount?

The mirror on the ball support operates, climbing the camera on the ball mount. It permits you to use the camera on the ball peaks while looking through the mirror.

The mirror on the ball support also helps you see what’s occurring behind you when moving. This way, you can avoid accidents and other dangerous situations. If you don’t use the mirror, you won’t be able to see what is happening behind you when you turn around.

What Are The Objectives Of The Mirror On The Ball Mount?

The mirror on the ball mount uses to help aim the ball mount. It lets you see where the ball is about the receiver, making it easier to line them up correctly. It is beneficial when the vehicle is parked, and the driver needs to see what is behind it. This feature is useful for cyclists who check out traffic while riding.

Is There A Way To Put The Rearview Mirror Back On The Ball Mount?

Yes, there is a way to put the mirror back on the ball mount. The first step is to remove the ball mount from the car. Next, locate the screw holes on the bottom of the mirror frame. Then, utilize a tiny flathead screwdriver to lever out the pins. Finally, slide the mirror back into place. The process is effortless and takes about 10 minutes.

Why Won’t The Rearview Mirror Move?

The rearview mirror doesn’t move because it is attached to the car frame—it sticks in place. If you need to change the position of the mirror, you need to remove the mirror from the vehicle and then reattach it at another location.

The rearview mirror fixes in place for a few reasons. One cause is that it decreases the quantity of breeze bluster in the auto. Another reason is that it helps to improve the car’s aerodynamics.

Final Verdict

In short, putting the rearview mirror back on the ball mount is relatively straightforward. All you require is about 10 minutes of your time. However, it is essential to ensure that it is correctly attached to provide the driver with a definite view of what is behind them. If you have any questions or concerns, consult your vehicle’s owner’s manual or contact a professional mechanic.