The air pressure in the braking system is converted into a force that can stop massive vehicles using brake chambers. However, they may wear out and malfunction over time, just like any other element of an automobile, putting the entire system in danger. This article will explain how to cage the brake chamber.
How to Cage a Brake Chamber
Cage brakes are only used if the air brake system has failed, and you only need to take the unit to a safe harbor, not to normal operation. This procedure releases the spring tension in the brake chamber and, when complete, leaves the wheel with no brakes.
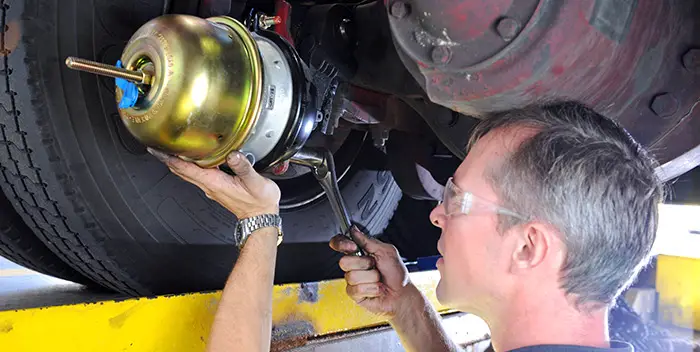
- Find the brake chamber in front of the wheel. You want to release and climb under the truck or trailer to release the brakes.
- You will find the hexagon socket plug of the tube in the chamber itself. It is mounted on the brake chamber clamp. Remove the nut, washer, and tool from the holder.
- Remove the dust cover from the brake chamber
- Insert the cage tool into the chamber and turn it 1/4 clockwise to insert the tool
- Install the washer and nut
- Tighten to approximately 2.5 inches of exposed cage tools. It’s hard work because you’re compressing the spring by hand.
- At this point, your brakes on this truck should be released. If not, keep turning until it releases
How to Replace Brake Chambers?

Get Ready
The first step is to organize your workspace. Make sure the automobile is on a flat floor by placing wedges beneath the wheels. Then locate a location beneath the broken brake chamber.
Brake Chamber should be evacuated.
Remove the chamber storage tool (tool T) with a 3/4-inch wrench, and then remove the stopper from beneath the chamber. The cage tool should be positioned well behind the brake chamber as feasible. Then twist it clockwise once you sense it locks.
This is repeated till the tool can be extracted. With a wrench, tighten the cage nut. Then there are the connector nuts to remove from the fork pins. After that, you should turn off the controller. Disconnect all air lines and fittings using a wrench as well.
After that, you’ll need to remove the two bolts and nuts from the braking system cylinder before removing and storing it.
Get Ready to Discard the Rod
Using a set of channel locks, loosen the nut in the cage and remove the chamber wire locknut. Remove the fork from the cartridge shaft at the same time. This focuses on measuring the braking system baseline up to this bar. Keep track of the results for future reference.
Shorten the New Room Beam
Connect the new cartridge to the vice grip and lengthen the cylinder rod to the same diameter. Secure a spot on the bar where you’ll be cutting the talc. The surplus may then be cut away using a hacksaw. Certain jobs need smoothing down any rough edges after using a steel blade. Thread the fork again until both terminals are visible.
Restore the Cage Tool
Enter the new chamber beneath the truck. Start by twisting the cage again until it locks, then inserting it from behind the braking mechanism. It’s alright if it doesn’t come out. After that, replace the screw and torque it firmly.
Install the Brake Chamber
To tighten the mounting bolts on the pin:
- Place the brake compartment with the apertures against the metal frame.
- Replace the fork and cotter pins and reconnect the airline to the cylinder.
- Consult a professional or study the manufacturer’s directions if you require brake adjustments.
Frequently Asked Questions
Do you have to close the cage when removing the brake chamber?
When removing the brake chambers, the reason for the cage is that you can remove the adjuster pins. No voltage on the pins. If you release the brakes before removing the airline, you will not need the cage brakes. The rooms are not caged when buying new ones.
What happens when you close the brake chamber?
Cage brakes are only used if the air brake system has failed, and you only need to take the unit to a safe harbor, not to normal operation. This procedure releases the spring tension in the brake chamber and, when complete, leaves the wheel with no brakes.
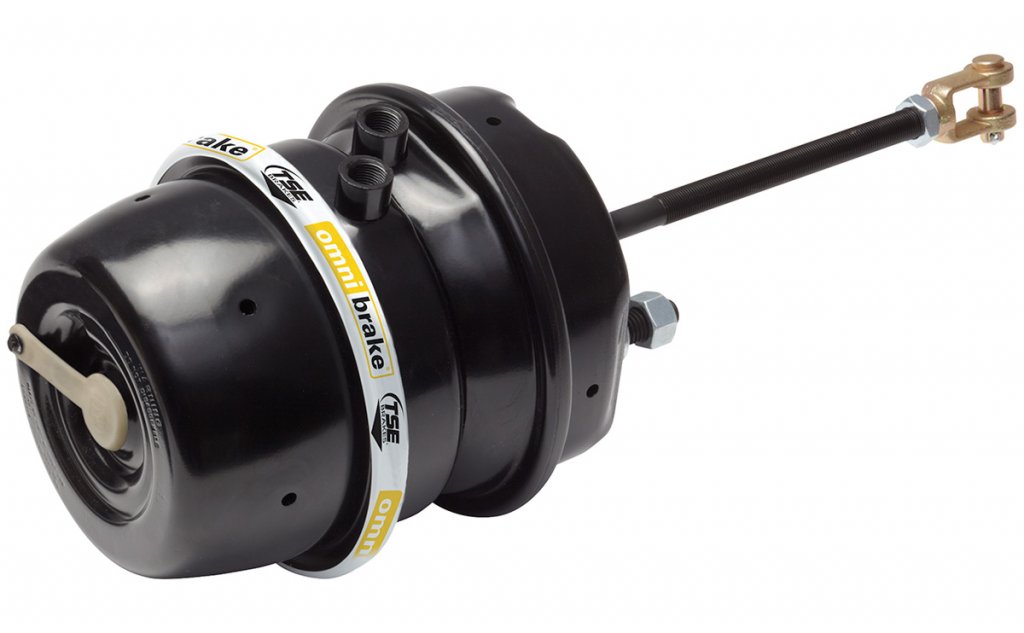
How does the spring break chamber work?
Rather than using air to apply the brakes, the spring brake chambers use a massive coil spring to work on the brakes. This provides enough force to retain the brakes in the retracted position. The appearance of the spring brake chambers differs from that of the service brake chambers.
How does the brake chamber work in a truck cage?
The spring is retracted to its shortest length by tightening the nut so that the brake is not forced. Using a parking brake usually releases this spring, allowing the bolt to hold it in the cage or the activated position, allowing the chamber to open without releasing the spring.
How do spring brake chambers differ from service brake chambers?
Rather than using air to apply the brakes, the spring brake chambers use a massive coil spring to work on the brakes.
This provides enough force to retain the brakes in the retracted position. The appearance of the spring brake chambers differs from that of the service brake chambers.
What causes the spring in the air brake to release?
The huge coil spring brake chamber is squeezed under extremely high stress. Manipulation, damage, or corrosion can cause the spring to break free, causing the air brake chamber components to move unexpectedly. Never attempt to repair or maintain an air brake chamber since it might be harmful.
How do you release the spring brake?
The emergency and parking brakes are activated by a control valve similar to traditional spring braking systems. Actuate the control valve and then depress the brake pedal for three to five seconds to release the spring brakes.
Conclusion
The brake is usually “caged” for one of several purposes. It can be placed in a cage on a towed vehicle as no air is supplied to this vehicle. This includes driveway work and towing vehicles that do not require braking in most cases.

James Carter is an automotive blogger, reviewer, and technology enthusiast based in the USA. With a deep passion for cars and years of experience following the automotive industry, James focuses on delivering honest, well-researched content that helps readers make smarter decisions.