Wiring car speakers to an amplifier can be easy if you have the right tools and follow the correct steps. In this article, we will guide you through how to wire car speakers to amp diagram a step-by-step diagram.
These are the steps that we are going to follow:
- Gather the tools and materials
- Check the wiring diagram for the amp and speakers
- Connect the power and ground
- Connect the speaker wires to the amp
- Connect the remote’s turn-on wire
- Connect the main power wire
- Test the connections
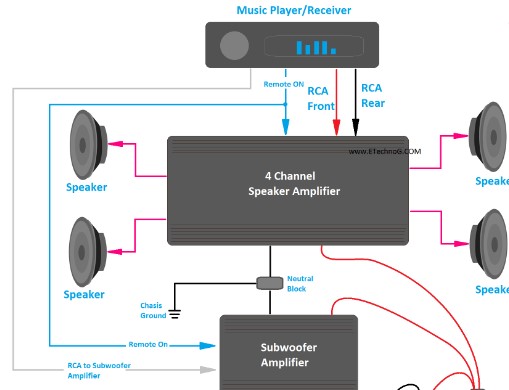
How to Wire Car Speakers to Amp Diagram
Step 1: Gather the Tools and Materials
Before beginning the process, ensure you have all the necessary tools and materials. The tools you will need include:

- A screwdriver.
- Wire cutters.
- Wire strippers.
- Crimpers.
You will also need the following materials:
- Speaker wire.
- Power wire.
- Ground wire.
- RCA cables.
Step 2: Check the Wiring Diagram for the Amp and Speakers

Before wiring the car speakers to the amplifier, checking the wiring diagram for both the amp and speakers is essential.
This will ensure you connect the wires correctly and avoid damaging the speakers or amplifiers.
Step 3: Connect the Power and Ground

The first step in wiring the car speakers to the amplifier is connecting the power and ground wires.
The power wire carries electricity from the battery to the amplifier, while the ground wire connects the amplifier to the car’s chassis.
Connect the power wire to the battery’s positive terminal and the ground wire to a metal part of the car’s frame.
Step 4: Connect the Speaker Wires to the Amp

Once you have connected the power and ground wires, it’s time to connect the speaker wires to the amplifier. Connect the wires to the output terminals on the amplifier, matching the positive and negative wires with the corresponding terminals.
Step 5: Connect the Remote’s Turn-On Wire

Next, connect the remote’s turn-on wire to the amplifier. This wire signals the amplifier to turn on when the car’s ignition is turned on. Connect the wire to the remote turn-on terminal on the amplifier.
Step 6: Connect the Main Power Wire

Finally, connect the main power wire to the amplifier. This wire connects the amplifier to the car’s battery and provides power to the amplifier. Connect the wire to the positive terminal on the amplifier.
Step 7: Test the Connections
After completing the wiring process, it’s essential to test the connections to ensure everything works correctly. Turn on the car’s stereo and adjust the volume to ensure the speakers function correctly. If everything works correctly, your car speakers are now wired to the amplifier!
My Opinion
Wiring car speakers to an amplifier requires careful attention to detail and safety measures. Following the expert-recommended diagram ensures optimal sound quality and prevents potential damage. For the best results, consider seeking assistance from a professional car audio installer. Enjoy a superior audio experience on your journeys with well-connected speakers and an amplifier.

James Carter is an automotive blogger, reviewer, and technology enthusiast based in the USA. With a deep passion for cars and years of experience following the automotive industry, James focuses on delivering honest, well-researched content that helps readers make smarter decisions.